Thursday, December 6, 2012

Pillowcase Inspiration

I snagged a bunch of nice pillows at a great price on Black Friday, thinking they'd make good budget-friendly gifts.  I've got plenty of fabric, so now I'm on the lookout for inspiration.  I mean, anyone can sew a few straight seams and a hem, right?  Well, maybe not anyone, but I was looking for something a little more creative.  So I turned to the internet.


And of course, I wasn't disappointed.  Here are just a few of the beauties I found:

Here's a super-cute pillowcase from The Cottage Home blog that uses different fabrics and treatments for the edges.  I love the girly-girl look of this and I could totally see making a few of these for the girls on my list! 

Not a diy, but I could see this mustache pillow from Urban Outfitters being an easy knock-off.
These beautiful fleece pillowcases from Flax and Twine look so snuggly and cute! 
Simple monograms and appliques would make them easy to personalize.
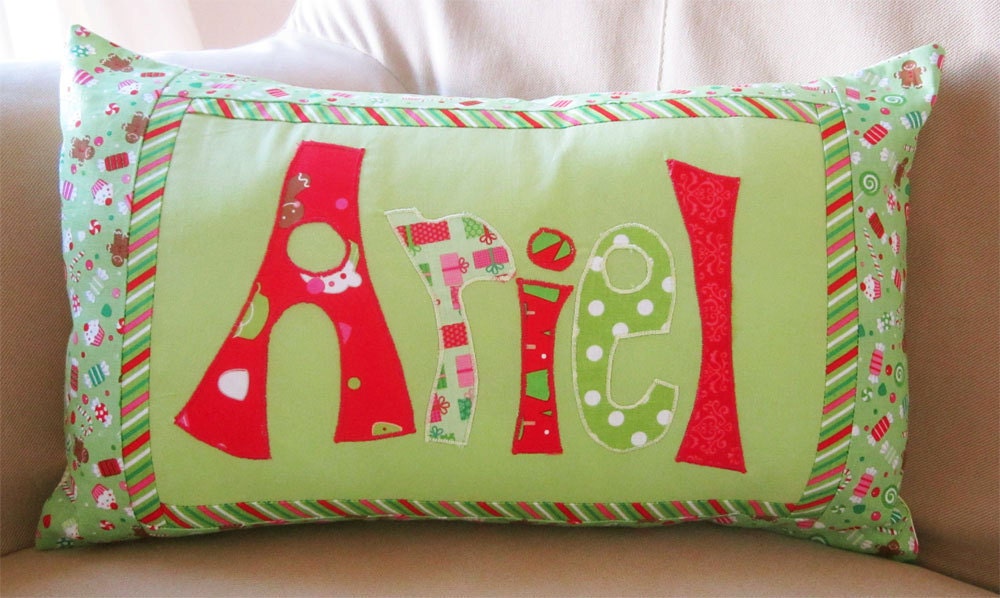


These next two I spotted on Etsy

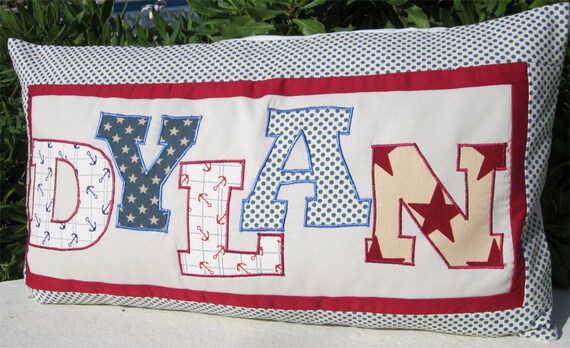
I just love how using different fabrics and fonts can transform the theme of a pillow!
These pocket pillows by Suzanne at Just Another Hangup would be a fabulous way to give a small gift--just tuck a book or a small stuffed animal in the pocket. 
These adorable pillowcases from A Beautiful Mess would make sweet gifts for a wedding shower, or even a house-warming.
Isn't this pillowcase from over at Instructables.com a great idea for a toddler pillowcase? 
Just let them go with some washable markers, then pop it in the washer.
These "pillows" have been floating around Pinterest in one form or another. 
An easy knock-off using just a couple of lengths of fabric with strategically placed seams. 
And finally, a knock-off idea for the kids, or the kid in you.  Simple white pillowcases and fabric markers!
Until next time,
(when, hopefully I will have a few pillowcases completed)
Go Get Crafty, Sister!
~Sister #1

Friday, November 16, 2012

Turkey Tutu

Pin It
Recycled crafts:  toddler tutu
Sweet little girl with Turkey Onesie and tutu.  From start to finish, two hours, tops!
A few weeks before Thanksgiving, right about the time I discovered Pinterest, I stumbled across the photo below and knew I had to make one (the outfit, not the baby, lol)! I love how it turned out.

Recycled crafts:  toddler tutu

How To:

Supplies:
  1. Turkey Pattern (see below)
  2. Onesie
  3. 1 yard each of orange, yellow and ivory tulle
  4. Ribbon and fabric scraps
  5. Wonder Under
  6. Optional:  Fabric paint, needle and thread or sewing machine
  7. The following tutorial:  How to Make a Tutu No Sew 

Steps:
  1. Enlarge or reduce the pattern to fit the onesie
  2. Cut one body, one beak and six wings out of your chosen fabric.
  3. Follow the directions on the Wonder Under to apply the turkey to the onesie.
  4. Optional:  Use fabric paint to outline the turkey, or sew a zigzag stitch around the edges of each pattern piece.
  5. Watch and follow along with the video on making the tutu, using the tulle and ribbon
  6. Dress a cute baby in the outfit and bring on the smiles!


Recycled crafts:  toddler tutu:  turkey pattern


There are all kinds of tutus on Pinterest; many are on my mental "to do" list.
Here are some of my favorites:

Recycled crafts:  toddler tutu:  snowbaby
Snowbaby


Until next time,
~Sister #2

Thursday, November 15, 2012

Garden Table


 While dumpster diving one day I came across this broken outdoor table.  There's a little spot in my garden that's crying for attention, and I thought I might be able to fix the table--it was only broken in one place!  However, when I got it home I realized that that "one place" was a pretty important place--so I needed to rethink my idea.  It sat in my garage waiting for my inspiration.


That inspiration came in the form of an old stool I had finally decided to send to the curb.  It was a  VERY old stool.  In fact, when I turned it over I found that the stool had originally belonged to my daughter back when she thought she had to label everything as her own.  (Maybe 12-13ish?)


She is now married with a daughter of her own! 

Anyway, here is how the project went:

First I lowered the legs to give the table stability, and to fit the size I had in mind.
Next I gave both the chair and the table a couple of coats of this textured paint I already had on hand. 
I'm not in love with the color, but it will have to do for now.


Next, I plopped the top onto the stool and drilled holes here and there through the stool. 
I fed a strand of strong wire through the holes from the top.


Then I turned it over and gave the wire a few strong twists and cut off the ends. 
(I'm kinda bummed I didn't think to leave my daughter's name.)
I turned it back over and gave the whole thing another coat of paint.

And here it is in its new home, ready to show off a few plants or, with a couple of chairs,
serve as a child's table at an outdoor dinner.
 I'm loving that I have a table just the right size I was looking for, and it was free to boot!
Until next time,
Go Get Crafty, Sister!
 ~Sister #2

Sunday, October 28, 2012

Palette Chair


This is the palette that became the chair that appears in the picture at the top.


I've seen chairs made out of palettes, but when it came time to actually make my own, I couldn't find the instructions anywhere.  I finally was able to find a 60-second "How to build a pallet chair" by HGTV, which I played over and over and over again until I had a good general idea of how it was done.  Still, it took a lot of trial and error on the first one.  And since all palettes are not the same, each one had to be done a little bit differently.  Still, I think with that good general idea and a lot of patience, anyone can create one of these!

Now the one in the picture above is not the one I am showing in the tutorial, but it's the same general process. 

First find a palette with 4 side beams.  Cut your palette into 3 main pieces:


A piece like this, complete with two beams--one on each side.  We'll call this the bottom.

And two incomplete pieces that look like this, with a beam on only one side.
Remove the slats from the bottom so you have three left.


Remove all the slats from one of the incomplete pieces, leaving you with a beam.
We are going to insert this beam into the remaining incomplete piece so that it will also have two sides, but be thinner than the bottom.  We will call this piece the back.


Now, this next step is very important:  Measure!
You want to measure the inside width of the bottom and the outside width of the back.  In this case, the inside width between the beams of the bottom is 13.75.


Position the new beam between the slats of the back, making sure the outside measurement of the beams in the same (or about a 1/4" less) than the inside measurement of the bottom.  The tighter the fit, the easier it will be to work with later.


Nail the slats in place, then flip it over and nail the supporting slats as well. 

Next, remove the lower 3 slats from the back.  
(Sorry I don't have a photo of it, but you'll see what I mean in the next step.)


Lay the two pieces on their sides and wedge the lower part of the back between the lower part of the bottom.  It should be a tight fit.  I had to use a hammer to tap it into place.

Set it back up and adjust the back slope to your liking.  I was using a nail gun, so I just put a couple of nails where the beams cross.  Then at the end I went back and put in the screws.  But you can skip the nail step and just go ahead and put your screws in now.

Take a few of the leftover slats and nail them to the front for the legs.  I used 13" legs and they were just right.
I added another slat about half way between the top and bottom slats for more support.


One more support piece went to steady the back.


Finally I used screws everywhere I used nails.

And here it is in the garden.


So that's it!
Now with a little sanding and maybe some stain, I'll have some good garden chairs.  
 And the great thing is, they didn't cost a cent!

Until next time,
Go Get Crafty, Sister!
 ~Sister #2


Wednesday, October 17, 2012

Inspiration for "Stuff"

Whenever I'm browsing the web looking for inspiration, I usually find that I'm looking for stores "like Pottery Barn" or "like Pier 1," because, let's face it, even though there are more places out there that are just as inspiring, they don't roll off the tongue (or the fingertips) as easily as those do. 

So today I set out to find stores that have awesome "stuff" and are easy to navigate.  Some stores I found had awesome stuff, but it was so hard navigating the site that I quickly became frustrated and closed the page.  So here is my list, ready and waiting for when the urge strikes me.

The first is Pronto Home, which is not really a store, but a collection of stores.  If I need something specific, Pronto Home will help me find it quickly without having to go to each specific store.

The rest are loosely ordered according to ease of navigation.  I especially like if the user is able to "view all" when browsing.

Jonathan Adler

Bellacor

Hayneedle

Front Gate

Ballard Designs

Inside Avenue

Layla Grayce

West Elm

Wisteria

Burke Decor

Emmo Home

Artisanti


Have a favorite I should try?  Please let me know and I'll add it to the list!  Always looking!

Until next time,
Go Get Crafty Sister!
~Sister #3

Wednesday, October 10, 2012

Sun Shade Wannabe

My mother had a temporary carport that was tearing apart at the seams, so she decided it was time to take it down and stuff the trash can with it.  I, however, had other ideas.  Some of the sections were still in tact, so I dug them out of the bin and proceeded to turn them into shade for our back porch.
Completely in tact panel--no rips or tears.

Cut right down the middle.

Next I pulled out the sewing machine and hemmed the edges.  Yes, I know it's not perfect, but no one will see the him since it will be facing toward the sky.


I had these curtain grommets from a previous project.

They come with a template--all you have to do is decide on the placement, trace, and

cut.
The grommets come in two pieces:  one with a groove around the edge,
and the other with tiny spikes that fit through the fabric into the groove of the other one.
All you have to do is insert one...

and press the other one into place.  (The fabric is folded over, but I am still working on the cut area.)

All that's left is to hang and enjoy the shade!


Until next time,
Go Get Crafty, Sister!
~Sister #2
Related Posts Plugin for WordPress, Blogger...
Those Crafty Sister are 
ready to create a unique upcycled, 
recycled, craft gift or teach you 
basic diy craft skills. Join us 
at http://thosecraftysisters.blogspot.com/, 
our craft blog where you can see what 
we've been crafting and sharing lately.
Pin It