Hosting the first ever Pinterest Party (at least for us) should be great fun! Lots of laughs, good company, and spirits are expected...oh yes and time spent creating RECYCLED MAGAZINE CROSSES. Each guest is asked to bring pre-rolled cores and rolls made of 1/2 magazine page rolled into a tight circle + folded pages to use for outside border/frame.
MATERIALS:
1 or 2 old magazines (8 x 10 or 11 x 14)
box cutter
scissors
*14 - 18 small cores
*5 large rolls of varying sizes
*1 large roll to form center of cross
*18-20 folded 1/2 pages to use for outside border/frame
clothes pins
rubber bands
Modge Podge
paint brush
STEP 1: Find 1 or 2 outdated, non-essential magazines (preferably taking up space in the restroom magazine basket). The magazines should have slick pages (avoid those with thicker, smaller pages like National Geographic). Once the magazines have been chosen, try to stick to this same size or magazines for the entire cross.

STEP 2: Remove one page from the magazine. (Actually, I took a box cutter and removed the entire binding from the magazines on my original one.)

STEP 3: Cut this page in half. You will work with half pages to create each of the cores.

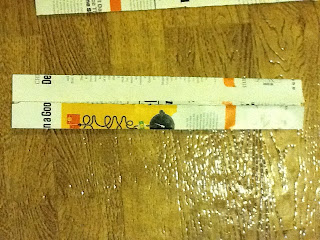
STEP 4: Using the half page, fold it in half (lengthwise).

STEP 5: Fold each side to the center.

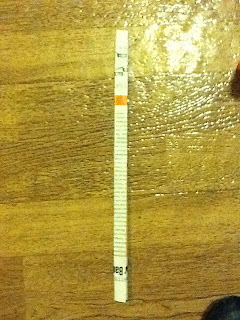
STEP 6: Repeat by folding each side into the center again.

STEP 7: Be sure edges are flattened by running a ruler along them. Then use Elmer's or stick glue to seal the inner fold together.

STEP 8: Fold the center together. Run a line of glue along one side of the folded paper.

STEP 9: Begin at one end and roll the page along the folded side that has been glued; roll tightly.

Until you reach the end of the page.

STEP 10: Set aside and fold another half page. Follow the same procedure, using glue to seal the center folds together and another line of glue along one side of the folded page. Beginning at the end of the initial roll, begin rolling the new folded page around the core.

STEP 11: This is a building process when producing the larger rolls for the cross and requires wrapping the newly folded pages around the core to make it grow larger and larger. As the core grows, wrap a rubber band around the resultant core to hold it together until the new page is folded and ready to glue on.

We used a 13oz. can of chicken breast to determine the size of the center roll for the cross. Once the roll grew to a size that it just fit into the top of the can, we began to work on the other 6 large rolls. These other 6 were of varying sizes. We also used an additional 14-18 small, "core" rolls to create the final cross shape.

(This cross can be found at TipJunky.) We will post Pinterest Party Pics and our crosses next week!
Peace be with you!
~Sister #1
Other RECYCLED MAGAZINE PROJECTS you might like:
RECYCLED MAGAZINE BOXES with tutorial at "Abstract Octopus"

You're first ever post...sniff, sniff. I'm so proud!
ReplyDeleteAny idea how many pages will make a large?
ReplyDeletenow I know how to make the rolls, but how do I put it together in the shape of a cross?
ReplyDeleteLay them out in the pattern you want and glue them together. Then take some folded strips and glue them around the outer edges. Sorry there aren't photos of that, but you can kind of see us doing it here: http://www.thosecraftysisters.com/2012/01/pinterest-part-recycled-magazine.html
Deletevery helpful!!!!!!!!!!!!!!!!!!!!!!!!!!!!!!!!!!!!!
ReplyDeleteI really wish you would put step by step directions on how to put them together. It's rather annoying to not have them and the picture isn't enough for me. I tried to look at tipjunky and that looked like a spammy page.
ReplyDeleteHow do you put the folded strips around the crosses? Do you overlap them? Do you use more than one layer? I'm right in the middle of this project, which looked really fun, until I realized the directions are not complete.
ReplyDeleteYes, we overlapped them. Whether you use more than one layer depends on how big and heavy the final cross will be. Start with one layer, and when it dries try to pick it up. If it is too flexible, use another layer. Your goal is to have a cross that will hang without sagging. Sorry that it seems as if the directions are incomplete, but every cross will be different.
ReplyDeletewhen/how do you use the modge podge?
ReplyDeleteI love this!
ReplyDeleteThe link doesn't work. What do you attach the pieces glue stick or modge lodge?
ReplyDeleteWe used regular white glue.
DeleteSo do you make the middle first then the border? About how long does it take to make the circles? I am trying to do this for summer camp with 8-12 year olds. I was going to have them do a little each day.
ReplyDeleteyes you make the middle first and then the border. How long really depends on how tight and how big will make the circles. Once you get that hang of it though, it goes very fast. I think you have a good plan. I would love to see what they make!
DeleteWhat are the modge podge, clothes pins and paint brush used for? I'm pretty stoked to start this fun project!! Thank you for posting the instructions!
ReplyDelete