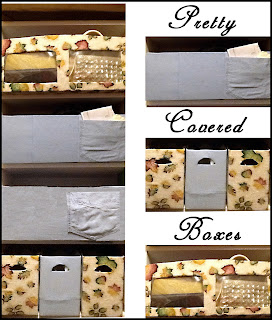
In the middle of one short wall I have a long cubby, with short, rather deep shelves that normally are full of things I've randomally shoved in. So, after seeing a few pins on Pinterest where other, more creative people than me, have turned diaper boxes into storage boxes, I decided to do the same. Since I don't have diaper boxes around any more, I came up with a few alternatives.
Here's how you could do it:
Gather your supplies:
- Boxes (My large boxes are the boxes we brought home the holiday wine in, and the smaller ones used to store the double gallons of milk from Costco.)
- Fabric scraps (Since my closet is one of the first things I see in the morning, I decided to use larger scraps for consistency--if not for coordination, lol)
- Plastic transparency paper or something similar (I used photo binder pages)
- Spray adhesive
- Scissors
- Patterns: Handle, Window
- Optional: Pockets cut from old jeans, shirts, etc. and fabric glue.
 |
| Those are clothes receipts in the pocket. |
Fabric covered boxes with optional pocket:
- Spread your fabric out on the floor and trace around the front of the box, leaving at least 6" all around.
- Spray the front of your box liberally with spray adhesive.
- Press the fabric against the front of the box.
- Spray the top 6" of fabric and fold into the box.
- Spray the remaining 6" of fabric and fold around the sides and bottom of box as if you were wrapping a present.
- Let dry overnight.
- Trim around pocket edges right up against the seam.
- Use your fabric glue to adhere the edges to your fabric.
Boxes with front handles:
- Spread your fabric out on the floor and trace around the front of the box, leaving at least 6" all around, and marking the spot for the handle.
- Using the pattern, cut a handle out of the box. Cut around the outside of the pattern (the solid lines).
- Spray the front of your box liberally with spray adhesive.
- Press the fabric against the front of the box.
- Cut the handle for the fabric, but this time, cut along the dotted lines, turn the fabric into the box, and glue down with some spray adhesive.
- Spray the top 6" of fabric and fold into the box.
- Spray the remaining 6" of fabric and fold around the sides and bottom of box as if you were wrapping a present.
- Let dry overnight.
Boxes with see through windows:
- Spread your fabric out on the floor and trace around the front of the box, leaving at least 6" all around, and marking the spots for thewindows .
- Using the pattern, cut the windows out of the box. Cut around the outside of the pattern (the solid lines).
- Spray the front of your box liberally with spray adhesive.
- Press the fabric against the front of the box.
- Cut the windows for the fabric, but this time, cut along the dotted lines, turn the fabric into the box, and glue down with some spray adhesive.
- Spray the inside front of the box and position the transparency paper over the windows.
- Spray the top 6" of fabric and fold into the box.
- Spray the remaining 6" of fabric and fold around the sides and bottom of box as if you were wrapping a present.
- Let dry overnight.
I still want to add labels, but for now, this is a big step toward my organizational goals!
Here are a few other organization ideas you might want to check out:
| Great use for old cd's. |
| Here are those pampers--how cool are these? And pretty too. |
| Tension rod and show curtain hooks = organized scarves. |
| Neat labels--chalkboard contact paper. No more messy torn off stickers when you're ready to make a change. |
| Much neater than mine. |
| Cute labels. |
Have a great day, and go Get Crafty!
~Sister #3
~Sister #3
(Don't forget Sister #1: the last one online, has to bring the wine! I beat you to it!)


Great post--love the pockets!
ReplyDelete